-1.png?height=120&name=imagotipo_negativo%20(1)-1.png)
Learn how to upload a catalog from your ecommerce or via URL to Feeds
This article refers to the originalwizard for configuring a Data Import. If your organization is already using the new wizard, please visit this article.
The original wizard looks like this:

In this guide we will delve into the synchronization of your catalog with AMP. We present you with two viable options to accomplish this seamlessly: via e-commerce integration or utilizing an URL.
In the following sections, we'll explain both methods.
E-commerce integrations
Within AMP, we offer seamless compatibility with the following e-commerce platforms:
- Shopify
- Vtex
- Magento
- Salesforce
- IBM Webstore (Contact Customer Success)
- SAP (Contact Customer Success)
To proceed, follow the instructions of the respective articles dedicated to each platform. Once done, return to the General Data section in this guide to continue your journey.
Synchronize your catalog via url
If you are not using an e-commerce integration and instead you want to connect your catalog through an URL, take a moment to review some crucial pointers that will ensure a seamless process.
If you are using Google's Spreadsheet, head to this article and follow the steps to sync your catalog with AMP.
First of all, check the required and optional fields for your catalog and industry and verify that your catalog file meets the following requirements:
1. File Formats: Ensure your catalog is in one of the following formats: XML, CSV or JSONL. Feeds' data import feature works seamlessly with these formats.
2. Image Formats: Verify that your images are in JPG, JPEG, PNG, SVG or WEBP format.
3. File Encoding: Your catalog file should be encoded in UTF-8. This encoding ensures that special characters and information are correctly interpreted during the file reading process.
4. Header Encoding: Double-check that the file's header is also encoded in UTF-8. This consistency helps prevent any data interpretation issues and ensures a smooth import.
To further enhance the catalog reading process, consider the following tips:
1. Avoid CDN Usage: If your catalog is hosted on a Content Delivery Network (CDN), it's best to bypass it for this particular upload. Directly accessing the information without going through a CDN will prevent any potential interference with the reading process.
2. White-list Our User-Agent: Add "feed-composer/1.0" to your server's white-list. This ensures that Feeds can access and read your catalog information seamlessly.
Now you are ready to upload your catalog to Feeds and create a Data Import.
First of all, we will go to Feeds Manager, click on Data Import and then on +Create Data Import.

If you're using a private url, make sure to send us the user, password and url through our Help Center and we'll help you create the Data Import.
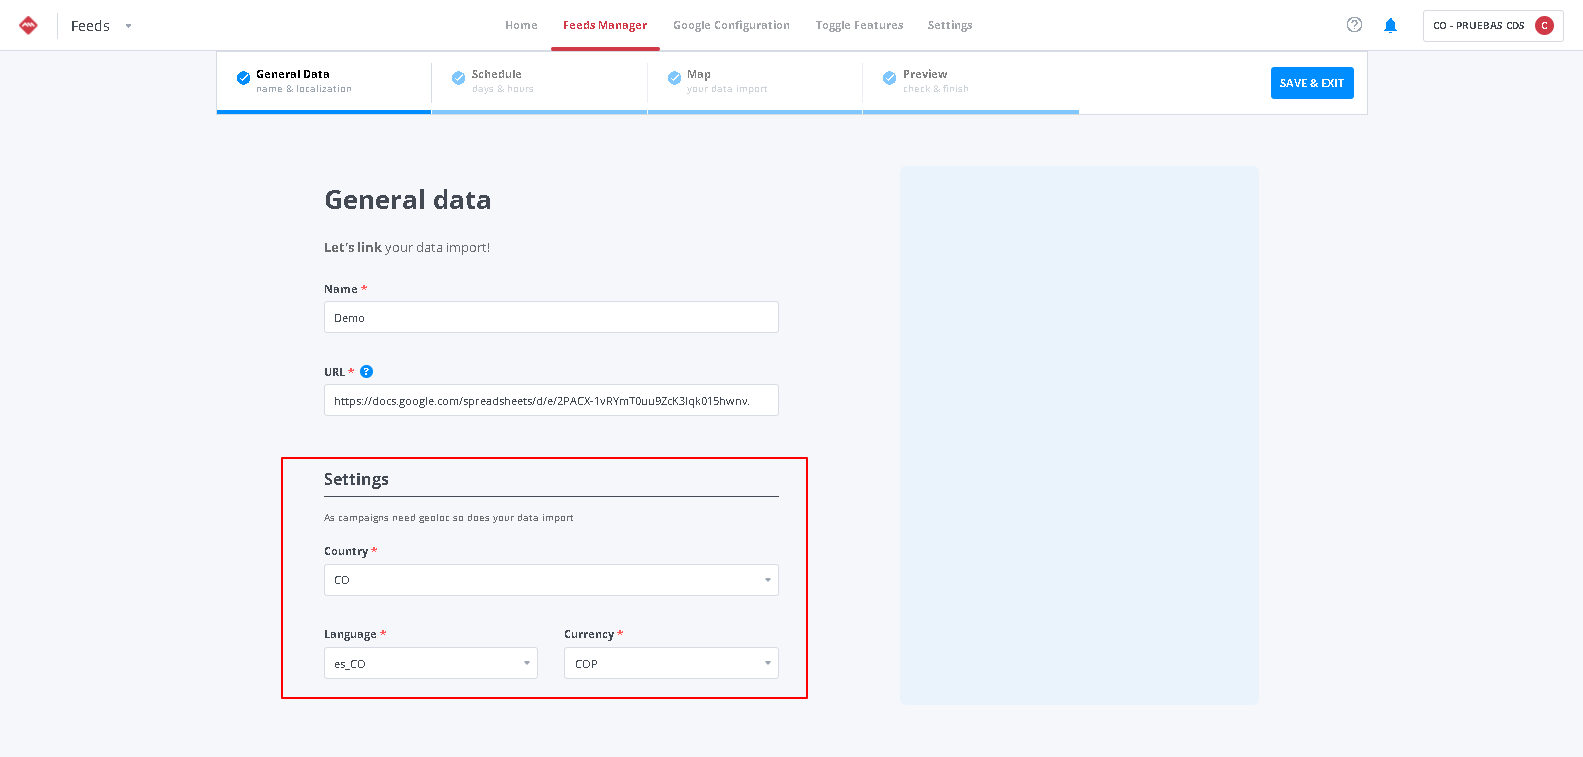
General Data
We´ll set the Data Import name and source URL, followed by country, language and currency. Once all this is set up, we'll click on Continue.
Catalog update frequency
Here we'll be able to set up how many times a day we want to refresh the information in the Data Import. For most cases, it is recommended to update it once or twice a day, at the most convenient hours taking into consideration our business needs.
-png.png)
For example, if we know that our catalog is generated at 8:00 in our ecommerce, we can schedule it here at 8:30 so we ensure that the content of the catalog processed in Feeds Manager will be updated properly.
Time is always UTC (Coordinated Universal Time). If our catalog is processed at 8:00 in our time zone we must adjust the timing to the Greenwich Meridian.
We press Continue, and we are almost done, let's try fields mapping.
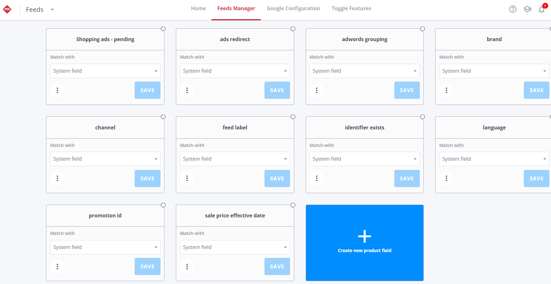
Fields Mapping
When uploading a new catalog, we need to map all product information in our system with the standard fields that all platforms work with.
This appropriate configuration of the fields in our catalog prevents us from experiencing issues with platforms like Facebook or Google.

We match our catalog fields with the Required fields (availability, id, image_link, link, price, and title) and Optional fields of the feed by choosing the field we want and click Save.

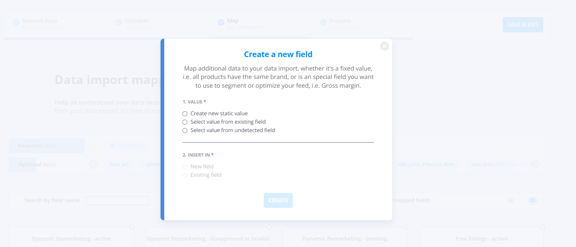
The first one, Create a new static value, creates a new field with the same value for all products. For example, in order to create the ''availability'' field and fill it with the value "in stock", we'll first enter the value and then we'll name this field.
Select value from existing field, selects a field from the source and map it to a new field that is not available in the drop-down list. For instance, if we need to map the field "custom_label_0" to a new field named "season" (which is not in the drop-down list because it is not a standardized name), we can select the source field and map it into a new field.
Last option, Select value from undetected field, is helpful when the field to map is not detected by AMP at first glance. In this case, we'll have to insert the exact field name from the source in order to be detected and mapped.
When all fields are mapped, we click on Continue and we'll go to the product preview.
Product Preview
In this step we'll see a preview of how the products will be seen, to assure the catalog is set up as it should, we click on Save & Exit.
Once done, the next step would be to Create an Optimized Feed that will serve to launch catalog campaigns on any platform.
In this new feed we will be able to segment products and improve your catalog through optimizations so they look more interesting and attractive to your potential customers.
¿Do you still have doubts?
Check out the following video guide on how to create a new Data Import: